Style Perks: Difference between revisions
From MCC Island Wiki
More actions
2/10 perks |
6/15 perks |
||
| Line 197: | Line 197: | ||
=== Expanded Meter === | === Expanded Meter === | ||
<center> | |||
{| class="wikitable" | |||
!colspan="2"|[[File:Perk-Expanded Meter.png|24px]] Expanded Meter | |||
|- | |||
|colspan="2"|Increases the number of '''[[Daily Meter|<span style="color: white>Daily Meter</span>]]''' claims you can do each day. | |||
|- | |||
|<span style="font-weight: bold">Initial Total: 7</span> | |||
|<span style="font-weight: bold">Final Total: 14</span> | |||
|- | |||
| colspan="2" | '''Total Upgrade Cost:''' | |||
|- | |||
|{{Style Perk Cost/7-Tier|Total-1}} | |||
|{{Style Perk Cost/7-Tier|Total-2}} | |||
|- | |||
!colspan="2"|Each perk tier increases the number of claims by 1 | |||
|- | |||
!colspan="2"|See individual tiers' costs and requirements <span class="mw-collapsible-toggle mw-customtoggle-ExpandedMeter"><span style="color: #5C85D6">'''Collapse'''</span>/<span style="color: #5C85D6">'''Expand'''</span></span> | |||
|- id="mw-customcollapsible-ExpandedMeter" class="mw-collapsible mw-collapsed" | |||
|<span style="font-weight: bold">Tier 1</span><br />(Unlocked at<br />{{Style Level|3}}) | |||
|{{Style Perk Cost/7-Tier|1}} | |||
|- id="mw-customcollapsible-ExpandedMeter" class="mw-collapsible mw-collapsed" | |||
|<span style="font-weight: bold">Tier 2</span><br />(Unlocked at<br />{{Style Level|9}}) | |||
|{{Style Perk Cost/7-Tier|2}} | |||
|- id="mw-customcollapsible-ExpandedMeter" class="mw-collapsible mw-collapsed" | |||
|<span style="font-weight: bold">Tier 3</span><br />(Unlocked at<br />{{Style Level|15}}) | |||
|{{Style Perk Cost/7-Tier|3}} | |||
|- id="mw-customcollapsible-ExpandedMeter" class="mw-collapsible mw-collapsed" | |||
|<span style="font-weight: bold">Tier 4</span><br />(Unlocked at<br />{{Style Level|27}}) | |||
|{{Style Perk Cost/7-Tier|4}} | |||
|- id="mw-customcollapsible-ExpandedMeter" class="mw-collapsible mw-collapsed" | |||
|<span style="font-weight: bold">Tier 5</span><br />(Unlocked at<br />{{Style Level|39}}) | |||
|{{Style Perk Cost/7-Tier|5}} | |||
|- id="mw-customcollapsible-ExpandedMeter" class="mw-collapsible mw-collapsed" | |||
|<span style="font-weight: bold">Tier 6</span><br />(Unlocked at<br />{{Style Level|51}}) | |||
|{{Style Perk Cost/7-Tier|6}} | |||
|- id="mw-customcollapsible-ExpandedMeter" class="mw-collapsible mw-collapsed" | |||
|<span style="font-weight: bold">Tier 7</span><br />(Unlocked at<br />{{Style Level|63}}) | |||
|{{Style Perk Cost/7-Tier|7}} | |||
|} | |||
</center> | |||
=== Expanded Vault === | === Expanded Vault === | ||
<center> | |||
{| class="wikitable" | |||
!colspan="2"|[[File:Perk-Expanded Vault.png|24px]] Expanded Vault | |||
|- | |||
|colspan="2"|Increases the number of '''[[Weekly Vault|<span style="color: white>Weekly Vault</span>]]''' claims you can store each week. | |||
|- | |||
|<span style="font-weight: bold">Initial Total: 20</span> | |||
|<span style="font-weight: bold">Final Total: 55</span> | |||
|- | |||
| colspan="2" | '''Total Upgrade Cost:''' | |||
|- | |||
|{{Style Perk Cost/7-Tier|Total-1}} | |||
|{{Style Perk Cost/7-Tier|Total-2}} | |||
|- | |||
!colspan="2"|Each perk tier increases the number of claims that can be stored by 5 | |||
|- | |||
!colspan="2"|See individual tiers' costs and requirements <span class="mw-collapsible-toggle mw-customtoggle-ExpandedVault"><span style="color: #5C85D6">'''Collapse'''</span>/<span style="color: #5C85D6">'''Expand'''</span></span> | |||
|- id="mw-customcollapsible-ExpandedVault" class="mw-collapsible mw-collapsed" | |||
|<span style="font-weight: bold">Tier 1</span><br />(Unlocked at<br />{{Style Level|3}}) | |||
|{{Style Perk Cost/7-Tier|1}} | |||
|- id="mw-customcollapsible-ExpandedVault" class="mw-collapsible mw-collapsed" | |||
|<span style="font-weight: bold">Tier 2</span><br />(Unlocked at<br />{{Style Level|9}}) | |||
|{{Style Perk Cost/7-Tier|2}} | |||
|- id="mw-customcollapsible-ExpandedVault" class="mw-collapsible mw-collapsed" | |||
|<span style="font-weight: bold">Tier 3</span><br />(Unlocked at<br />{{Style Level|21}}) | |||
|{{Style Perk Cost/7-Tier|3}} | |||
|- id="mw-customcollapsible-ExpandedVault" class="mw-collapsible mw-collapsed" | |||
|<span style="font-weight: bold">Tier 4</span><br />(Unlocked at<br />{{Style Level|33}}) | |||
|{{Style Perk Cost/7-Tier|4}} | |||
|- id="mw-customcollapsible-ExpandedVault" class="mw-collapsible mw-collapsed" | |||
|<span style="font-weight: bold">Tier 5</span><br />(Unlocked at<br />{{Style Level|45}}) | |||
|{{Style Perk Cost/7-Tier|5}} | |||
|- id="mw-customcollapsible-ExpandedVault" class="mw-collapsible mw-collapsed" | |||
|<span style="font-weight: bold">Tier 6</span><br />(Unlocked at<br />{{Style Level|57}}) | |||
|{{Style Perk Cost/7-Tier|6}} | |||
|- id="mw-customcollapsible-ExpandedVault" class="mw-collapsible mw-collapsed" | |||
|<span style="font-weight: bold">Tier 7</span><br />(Unlocked at<br />{{Style Level|69}}) | |||
|{{Style Perk Cost/7-Tier|7}} | |||
|} | |||
</center> | |||
=== Arcane Claims === | === Arcane Claims === | ||
TBA | |||
=== Lucky Quests === | === Lucky Quests === | ||
<center> | |||
{| class="wikitable" | |||
!colspan="2"|[[File:Perk-Lucky Quests.png|24px]] Lucky Quests | |||
|- | |||
|colspan="2"|Improves your chances of getting higher rarity '''[[Reward Crate|<span style="color: white>Reward Crates</span>]]''' from your <span style="color: white>'''Daily'''</span> and <span style="color: white>'''Weekly Quests'''</span>. | |||
|- | |||
|'''Initial Chances:''' | |||
[[File:Common Reward Crate.png|24px]] Common Reward Crate - 60% | |||
[[File:Uncommon Reward Crate.png|24px]] Uncommon Reward Crate - 25% | |||
[[File:Rare Reward Crate.png|24px]] Rare Reward Crate - 10% | |||
[[File:Epic Reward Crate.png|24px]] Epic Reward Crate - 5% | |||
|'''Final Chances:''' | |||
[[File:Rare Reward Crate.png|24px]] Rare Reward Crate - 60% | |||
[[File:Epic Reward Crate.png|24px]] Epic Reward Crate - 25% | |||
[[File:Legendary Reward Crate.png|24px]] Legendary Reward Crate - 12% | |||
[[File:Mythic Reward Crate.png|24px]] Mythic Reward Crate - 3% | |||
|- | |||
| colspan="2" | '''Total Upgrade Cost:''' | |||
{{Style Perk Cost/10-Tier|Total-Coins}} | |||
|- | |||
|{{Style Perk Cost/10-Tier|Total-1}} | |||
|{{Style Perk Cost/10-Tier|Total-2}} | |||
|- | |||
!colspan="2"|See individual tiers <span class="mw-collapsible-toggle mw-customtoggle-LuckyQuests"><span style="color: #5C85D6">'''Collapse'''</span>/<span style="color: #5C85D6">'''Expand'''</span></span> | |||
|- id="mw-customcollapsible-LuckyQuests" class="mw-collapsible mw-collapsed" | |||
|colspan="2"|<span style="font-weight: bold">Tier 1</span> (Unlocked at {{Style Level|2}}) | |||
|- id="mw-customcollapsible-LuckyQuests" class="mw-collapsible mw-collapsed" | |||
!Upgrade Cost | |||
!New Chances | |||
|- id="mw-customcollapsible-LuckyQuests" class="mw-collapsible mw-collapsed" | |||
|{{Style Perk Cost/10-Tier|1}} | |||
|[[File:Common Reward Crate.png|24px]] Common Reward Crate - 53%<br>[[File:Uncommon Reward Crate.png|24px]] Uncommon Reward Crate - 25%<br>[[File:Rare Reward Crate.png|24px]] Rare Reward Crate - 15%<br>[[File:Epic Reward Crate.png|24px]] Epic Reward Crate - 7% | |||
|- id="mw-customcollapsible-LuckyQuests" class="mw-collapsible mw-collapsed" | |||
|colspan="2"|<span style="font-weight: bold">Tier 2</span> (Unlocked at {{Style Level|7}}) | |||
|- id="mw-customcollapsible-LuckyQuests" class="mw-collapsible mw-collapsed" | |||
!Upgrade Cost | |||
!New Chances | |||
|- id="mw-customcollapsible-LuckyQuests" class="mw-collapsible mw-collapsed" | |||
|{{Style Perk Cost/10-Tier|2}} | |||
|[[File:Common Reward Crate.png|24px]] Common Reward Crate - 41%<br>[[File:Uncommon Reward Crate.png|24px]] Uncommon Reward Crate - 30%<br>[[File:Rare Reward Crate.png|24px]] Rare Reward Crate - 20%<br>[[File:Epic Reward Crate.png|24px]] Epic Reward Crate - 9% | |||
|- id="mw-customcollapsible-LuckyQuests" class="mw-collapsible mw-collapsed" | |||
|colspan="2"|<span style="font-weight: bold">Tier 3</span> (Unlocked at {{Style Level|11}}) | |||
|- id="mw-customcollapsible-LuckyQuests" class="mw-collapsible mw-collapsed" | |||
!Upgrade Cost | |||
!New Chances | |||
|- id="mw-customcollapsible-LuckyQuests" class="mw-collapsible mw-collapsed" | |||
|{{Style Perk Cost/10-Tier|3}} | |||
|[[File:Common Reward Crate.png|24px]] Common Reward Crate - 34%<br>[[File:Uncommon Reward Crate.png|24px]] Uncommon Reward Crate - 30%<br>[[File:Rare Reward Crate.png|24px]] Rare Reward Crate - 25%<br>[[File:Epic Reward Crate.png|24px]] Epic Reward Crate - 11% | |||
|- id="mw-customcollapsible-LuckyQuests" class="mw-collapsible mw-collapsed" | |||
|colspan="2"|<span style="font-weight: bold">Tier 4</span> (Unlocked at {{Style Level|19}}) | |||
|- id="mw-customcollapsible-LuckyQuests" class="mw-collapsible mw-collapsed" | |||
!Upgrade Cost | |||
!New Chances | |||
|- id="mw-customcollapsible-LuckyQuests" class="mw-collapsible mw-collapsed" | |||
|{{Style Perk Cost/10-Tier|4}} | |||
|[[File:Common Reward Crate.png|24px]] Common Reward Crate - 22%<br>[[File:Uncommon Reward Crate.png|24px]] Uncommon Reward Crate - 35%<br>[[File:Rare Reward Crate.png|24px]] Rare Reward Crate - 30%<br>[[File:Epic Reward Crate.png|24px]] Epic Reward Crate - 13% | |||
|- id="mw-customcollapsible-LuckyQuests" class="mw-collapsible mw-collapsed" | |||
|colspan="2"|<span style="font-weight: bold">Tier 5</span> (Unlocked at {{Style Level|28}}) | |||
|- id="mw-customcollapsible-LuckyQuests" class="mw-collapsible mw-collapsed" | |||
!Upgrade Cost | |||
!New Chances | |||
|- id="mw-customcollapsible-LuckyQuests" class="mw-collapsible mw-collapsed" | |||
|{{Style Perk Cost/10-Tier|5}} | |||
|[[File:Uncommon Reward Crate.png|24px]] Uncommon Reward Crate - 48%<br>[[File:Rare Reward Crate.png|24px]] Rare Reward Crate - 35%<br>[[File:Epic Reward Crate.png|24px]] Epic Reward Crate - 15%<br>[[File:Legendary Reward Crate.png|24px]] Legendary Reward Crate - 2% | |||
|- id="mw-customcollapsible-LuckyQuests" class="mw-collapsible mw-collapsed" | |||
|colspan="2"|<span style="font-weight: bold">Tier 6</span> (Unlocked at {{Style Level|37}}) | |||
|- id="mw-customcollapsible-LuckyQuests" class="mw-collapsible mw-collapsed" | |||
!Upgrade Cost | |||
!New Chances | |||
|- id="mw-customcollapsible-LuckyQuests" class="mw-collapsible mw-collapsed" | |||
|{{Style Perk Cost/10-Tier|6}} | |||
|[[File:Uncommon Reward Crate.png|24px]] Uncommon Reward Crate - 39%<br>[[File:Rare Reward Crate.png|24px]] Rare Reward Crate - 40%<br>[[File:Epic Reward Crate.png|24px]] Epic Reward Crate - 17%<br>[[File:Legendary Reward Crate.png|24px]] Legendary Reward Crate - 4% | |||
|- id="mw-customcollapsible-LuckyQuests" class="mw-collapsible mw-collapsed" | |||
|colspan="2"|<span style="font-weight: bold">Tier 7</span> (Unlocked at {{Style Level|46}}) | |||
|- id="mw-customcollapsible-LuckyQuests" class="mw-collapsible mw-collapsed" | |||
!Upgrade Cost | |||
!New Chances | |||
|- id="mw-customcollapsible-LuckyQuests" class="mw-collapsible mw-collapsed" | |||
|{{Style Perk Cost/10-Tier|7}} | |||
|[[File:Uncommon Reward Crate.png|24px]] Uncommon Reward Crate - 25%<br>[[File:Rare Reward Crate.png|24px]] Rare Reward Crate - 50%<br>[[File:Epic Reward Crate.png|24px]] Epic Reward Crate - 19%<br>[[File:Legendary Reward Crate.png|24px]] Legendary Reward Crate - 6% | |||
|- id="mw-customcollapsible-LuckyQuests" class="mw-collapsible mw-collapsed" | |||
|colspan="2"|<span style="font-weight: bold">Tier 8</span> (Unlocked at {{Style Level|55}}) | |||
|- id="mw-customcollapsible-LuckyQuests" class="mw-collapsible mw-collapsed" | |||
!Upgrade Cost | |||
!New Chances | |||
|- id="mw-customcollapsible-LuckyQuests" class="mw-collapsible mw-collapsed" | |||
|{{Style Perk Cost/10-Tier|8}} | |||
|[[File:Rare Reward Crate.png|24px]] Rare Reward Crate - 70%<br>[[File:Epic Reward Crate.png|24px]] Epic Reward Crate - 21%<br>[[File:Legendary Reward Crate.png|24px]] Legendary Reward Crate - 8%<br>[[File:Mythic Reward Crate.png|24px]] Mythic Reward Crate - 1% | |||
|- id="mw-customcollapsible-LuckyQuests" class="mw-collapsible mw-collapsed" | |||
|colspan="2"|<span style="font-weight: bold">Tier 9</span> (Unlocked at {{Style Level|64}}) | |||
|- id="mw-customcollapsible-LuckyQuests" class="mw-collapsible mw-collapsed" | |||
!Upgrade Cost | |||
!New Chances | |||
|- id="mw-customcollapsible-LuckyQuests" class="mw-collapsible mw-collapsed" | |||
|{{Style Perk Cost/10-Tier|9}} | |||
|[[File:Rare Reward Crate.png|24px]] Rare Reward Crate - 65%<br>[[File:Epic Reward Crate.png|24px]] Epic Reward Crate - 23%<br>[[File:Legendary Reward Crate.png|24px]] Legendary Reward Crate - 10%<br>[[File:Mythic Reward Crate.png|24px]] Mythic Reward Crate - 2% | |||
|- id="mw-customcollapsible-LuckyQuests" class="mw-collapsible mw-collapsed" | |||
|colspan="2"|<span style="font-weight: bold">Tier 10</span> (Unlocked at {{Style Level|72}}) | |||
|- id="mw-customcollapsible-LuckyQuests" class="mw-collapsible mw-collapsed" | |||
!Upgrade Cost | |||
!New Chances | |||
|- id="mw-customcollapsible-LuckyQuests" class="mw-collapsible mw-collapsed" | |||
|{{Style Perk Cost/10-Tier|10}} | |||
|[[File:Rare Reward Crate.png|24px]] Rare Reward Crate - 60%<br>[[File:Epic Reward Crate.png|24px]] Epic Reward Crate - 25%<br>[[File:Legendary Reward Crate.png|24px]] Legendary Reward Crate - 12%<br>[[File:Mythic Reward Crate.png|24px]] Mythic Reward Crate - 3% | |||
|} | |||
</center> | |||
=== Boosted Quests === | === Boosted Quests === | ||
<center> | |||
{| class="wikitable" | |||
!colspan="2"|[[File:Perk-Boosted Quests.png|24px]] Boosted Quests | |||
|- | |||
|colspan="2"|Improves your chances of <span style="color: white>'''Daily'''</span> and <span style="color: white>'''Weekly Quests'''</span> appearing as <span style="color: white">Boosted</span>, which grants them <span style="color: white>'''2x Rewards'''</span>. | |||
|- | |||
|<span style="font-weight: bold">Initial Chance: 0%</span> | |||
|<span style="font-weight: bold">Final Chance: 50%</span> | |||
|- | |||
| colspan="2" | '''Total Upgrade Cost:''' | |||
{{Style Perk Cost/10-Tier|Total-Coins}} | |||
|- | |||
|{{Style Perk Cost/10-Tier|Total-1}} | |||
|{{Style Perk Cost/10-Tier|Total-2}} | |||
|- | |||
!colspan="2"|Each perk tier increases the chance by '''5%''' | |||
|- | |||
!colspan="2"|See individual tiers' costs and requirements <span class="mw-collapsible-toggle mw-customtoggle-BoostedQuests"><span style="color: #5C85D6">'''Collapse'''</span>/<span style="color: #5C85D6">'''Expand'''</span></span> | |||
|- id="mw-customcollapsible-BoostedQuests" class="mw-collapsible mw-collapsed" | |||
|<span style="font-weight: bold">Tier 1</span><br />(Unlocked at<br />{{Style Level|2}}) | |||
|{{Style Perk Cost/10-Tier|1}} | |||
|- id="mw-customcollapsible-BoostedQuests" class="mw-collapsible mw-collapsed" | |||
|<span style="font-weight: bold">Tier 2</span><br />(Unlocked at<br />{{Style Level|7}}) | |||
|{{Style Perk Cost/10-Tier|2}} | |||
|- id="mw-customcollapsible-BoostedQuests" class="mw-collapsible mw-collapsed" | |||
|<span style="font-weight: bold">Tier 3</span><br />(Unlocked at<br />{{Style Level|11}}) | |||
|{{Style Perk Cost/10-Tier|3}} | |||
|- id="mw-customcollapsible-BoostedQuests" class="mw-collapsible mw-collapsed" | |||
|<span style="font-weight: bold">Tier 4</span><br />(Unlocked at<br />{{Style Level|20}}) | |||
|{{Style Perk Cost/10-Tier|4}} | |||
|- id="mw-customcollapsible-BoostedQuests" class="mw-collapsible mw-collapsed" | |||
|<span style="font-weight: bold">Tier 5</span><br />(Unlocked at<br />{{Style Level|29}}) | |||
|{{Style Perk Cost/10-Tier|5}} | |||
|- id="mw-customcollapsible-BoostedQuests" class="mw-collapsible mw-collapsed" | |||
|<span style="font-weight: bold">Tier 6</span><br />(Unlocked at<br />{{Style Level|38}}) | |||
|{{Style Perk Cost/10-Tier|6}} | |||
|- id="mw-customcollapsible-BoostedQuests" class="mw-collapsible mw-collapsed" | |||
|<span style="font-weight: bold">Tier 7</span><br />(Unlocked at<br />{{Style Level|47}}) | |||
|{{Style Perk Cost/10-Tier|7}} | |||
|- id="mw-customcollapsible-BoostedQuests" class="mw-collapsible mw-collapsed" | |||
|<span style="font-weight: bold">Tier 8</span><br />(Unlocked at<br />{{Style Level|56}}) | |||
|{{Style Perk Cost/10-Tier|8}} | |||
|- id="mw-customcollapsible-BoostedQuests" class="mw-collapsible mw-collapsed" | |||
|<span style="font-weight: bold">Tier 9</span><br />(Unlocked at<br />{{Style Level|65}}) | |||
|{{Style Perk Cost/10-Tier|9}} | |||
|- id="mw-customcollapsible-BoostedQuests" class="mw-collapsible mw-collapsed" | |||
|<span style="font-weight: bold">Tier 10</span><br />(Unlocked at<br />{{Style Level|73}}) | |||
|{{Style Perk Cost/10-Tier|10}} | |||
|} | |||
</center> | |||
=== Expanded Dailies === | === Expanded Dailies === | ||
=== Expanded Weeklies === | === Expanded Weeklies === | ||
=== Arcane Quests === | === Arcane Quests === | ||
TBA | |||
=== Efficient Fusion === | === Efficient Fusion === | ||
=== Efficient Assembly === | === Efficient Assembly === | ||
=== Expanded Forge === | === Expanded Forge === | ||
=== Expanded Assembler === | === Expanded Assembler === | ||
=== Arcane Anomaly === | === Arcane Anomaly === | ||
TBA | |||
Revision as of 18:22, 18 August 2025
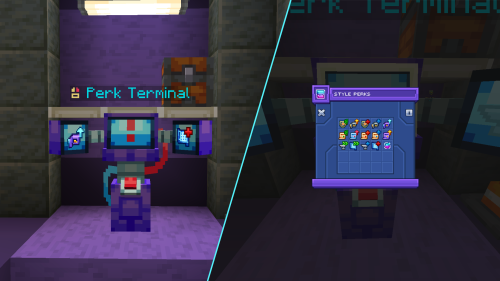
![]() Style Perks allows players to improve many different aspects of their Island progression. They affect the Fusion Forge, Blueprint Assembler, Daily and Weekly Quests, Daily Meter and Weekly Vault. They were introduced in 0.24.0 as a replacement for the old system of Quest and Crafting Milestones.
Style Perks allows players to improve many different aspects of their Island progression. They affect the Fusion Forge, Blueprint Assembler, Daily and Weekly Quests, Daily Meter and Weekly Vault. They were introduced in 0.24.0 as a replacement for the old system of Quest and Crafting Milestones.
Perks must be upgraded with ![]() coins and materials, and must first be unlocked by levelling up your Style Level. Each level reached unlocks a new perk or tier.
coins and materials, and must first be unlocked by levelling up your Style Level. Each level reached unlocks a new perk or tier.
Style Perks can be accessed at the Perk Terminal, located in Splinter's Workshop, or through a button in the Cosmetic Collections menu.
Navigation
Perks
Lucky Meter
| Improves your chances of getting higher rarity Reward Crates from your Daily Meter. | |
| Initial Chances: | Final Chances: |
| Total Upgrade Cost: | |
| 12x 20x 20x 20x 8x 3x |
5x 5x 5x 5x 5x 2x 15x |
| See individual tiers Collapse/Expand | |
| Tier 1 (Unlocked at | |
| Upgrade Cost | New Chances |
| 25,000 5x 3x 2x |
|
| Tier 2 (Unlocked at | |
| Upgrade Cost | New Chances |
| 50,000 7x 5x 3x |
|
| Tier 3 (Unlocked at | |
| Upgrade Cost | New Chances |
| 100,000 5x 3x 2x |
|
| Tier 4 (Unlocked at | |
| Upgrade Cost | New Chances |
| 200,000 7x 5x 3x |
|
| Tier 5 (Unlocked at | |
| Upgrade Cost | New Chances |
| 300,000 5x 3x 2x |
|
| Tier 6 (Unlocked at | |
| Upgrade Cost | New Chances |
| 500,000 7x 5x 3x |
|
| Tier 7 (Unlocked at | |
| Upgrade Cost | New Chances |
| 700,000 5x 3x 2x |
|
| Tier 8 (Unlocked at | |
| Upgrade Cost | New Chances |
| 1,000,000 7x 5x 3x |
|
| Tier 9 (Unlocked at | |
| Upgrade Cost | New Chances |
| 1,500,000 1x 2x 1x 5x |
|
| Tier 10 (Unlocked at | |
| Upgrade Cost | New Chances |
| 2,000,000 2x 3x 1x 10x |
|
Glitched Claims
| Improves your chances of getting 2x Rewards from your Daily Meter and Weekly Vault on claim. | |
| Initial Chance: 0% | Final Chance: 60% |
| Total Upgrade Cost: | |
| 12x 20x 20x 20x 8x 3x |
5x 5x 5x 5x 5x 2x 15x |
| Each perk tier increases the chance by 5% | |
| See individual tiers' costs and requirements Collapse/Expand | |
| Tier 1 (Unlocked at |
25,000 5x 3x 2x |
| Tier 2 (Unlocked at |
50,000 7x 5x 3x |
| Tier 3 (Unlocked at |
100,000 5x 3x 2x |
| Tier 4 (Unlocked at |
200,000 7x 5x 3x |
| Tier 5 (Unlocked at |
300,000 5x 3x 2x |
| Tier 6 (Unlocked at |
500,000 7x 5x 3x |
| Tier 7 (Unlocked at |
700,000 5x 3x 2x |
| Tier 8 (Unlocked at |
1,000,000 7x 5x 3x |
| Tier 9 (Unlocked at |
1,500,000 1x 2x 1x 5x |
| Tier 10 (Unlocked at |
2,000,000 2x 3x 1x 10x |
Expanded Meter
| Increases the number of Daily Meter claims you can do each day. | |
| Initial Total: 7 | Final Total: 14 |
| Total Upgrade Cost: | |
| 7x 12x 17x 20x 8x 1x |
3x 3x 5x 5x 2x 1x 5x |
| Each perk tier increases the number of claims by 1 | |
| See individual tiers' costs and requirements Collapse/Expand | |
| Tier 1 (Unlocked at |
50,000 7x 5x 3x |
| Tier 2 (Unlocked at |
150,000 7x 5x 3x |
| Tier 3 (Unlocked at |
250,000 5x 3x 2x |
| Tier 4 (Unlocked at |
500,000 7x 5x 3x |
| Tier 5 (Unlocked at |
700,000 5x 3x 2x |
| Tier 6 (Unlocked at |
1,000,000 7x 5x 3x |
| Tier 7 (Unlocked at |
1,500,000 1x 2x 1x 5x |
Expanded Vault
| Increases the number of Weekly Vault claims you can store each week. | |
| Initial Total: 20 | Final Total: 55 |
| Total Upgrade Cost: | |
| 7x 12x 17x 20x 8x 1x |
3x 3x 5x 5x 2x 1x 5x |
| Each perk tier increases the number of claims that can be stored by 5 | |
| See individual tiers' costs and requirements Collapse/Expand | |
| Tier 1 (Unlocked at |
50,000 7x 5x 3x |
| Tier 2 (Unlocked at |
150,000 7x 5x 3x |
| Tier 3 (Unlocked at |
250,000 5x 3x 2x |
| Tier 4 (Unlocked at |
500,000 7x 5x 3x |
| Tier 5 (Unlocked at |
700,000 5x 3x 2x |
| Tier 6 (Unlocked at |
1,000,000 7x 5x 3x |
| Tier 7 (Unlocked at |
1,500,000 1x 2x 1x 5x |
Arcane Claims
TBA
Lucky Quests
| Improves your chances of getting higher rarity Reward Crates from your Daily and Weekly Quests. | |
| Initial Chances: | Final Chances: |
| Total Upgrade Cost: | |
| 12x 20x 20x 20x 8x 3x |
5x 5x 5x 5x 5x 2x 15x |
| See individual tiers Collapse/Expand | |
| Tier 1 (Unlocked at | |
| Upgrade Cost | New Chances |
| 25,000 5x 3x 2x |
|
| Tier 2 (Unlocked at | |
| Upgrade Cost | New Chances |
| 50,000 7x 5x 3x |
|
| Tier 3 (Unlocked at | |
| Upgrade Cost | New Chances |
| 100,000 5x 3x 2x |
|
| Tier 4 (Unlocked at | |
| Upgrade Cost | New Chances |
| 200,000 7x 5x 3x |
|
| Tier 5 (Unlocked at | |
| Upgrade Cost | New Chances |
| 300,000 5x 3x 2x |
|
| Tier 6 (Unlocked at | |
| Upgrade Cost | New Chances |
| 500,000 7x 5x 3x |
|
| Tier 7 (Unlocked at | |
| Upgrade Cost | New Chances |
| 700,000 5x 3x 2x |
|
| Tier 8 (Unlocked at | |
| Upgrade Cost | New Chances |
| 1,000,000 7x 5x 3x |
|
| Tier 9 (Unlocked at | |
| Upgrade Cost | New Chances |
| 1,500,000 1x 2x 1x 5x |
|
| Tier 10 (Unlocked at | |
| Upgrade Cost | New Chances |
| 2,000,000 2x 3x 1x 10x |
|
Boosted Quests
Expanded Dailies
Expanded Weeklies
Arcane Quests
TBA
Efficient Fusion
Efficient Assembly
Expanded Forge
Expanded Assembler
Arcane Anomaly
TBA
